


How to create fly to cart / basket effect using jQuery and CSS
I found a very nice and useful tutorial animation on codepen.io for your shopping cart projects you can put this cool animation of add to cart, long time ago I saw this animation of jQuery on a website and today I found it here going to give this demo to you and explain how to use it. Its basically an animation of jQuery when some one click on any item add to cart button that item’s picture fly and take place in your basket.
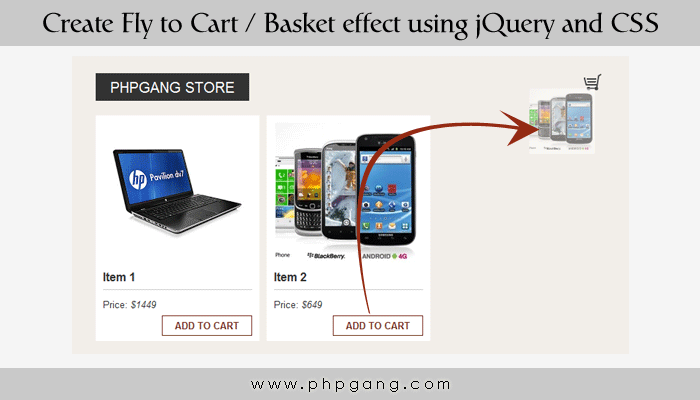
Its not a complete cart its only animation of fly to cart / basket
How to use it:
This is a simple jQuery script you can use it easily.
<script>
    $('.add-to-cart').on('click', function () {
        var cart = $('.shopping-cart');
        var imgtodrag = $(this).parent('.item').find("img").eq(0);
        if (imgtodrag) {
            var imgclone = imgtodrag.clone()
                .offset({
                top: imgtodrag.offset().top,
                left: imgtodrag.offset().left
            })
                .css({
                'opacity': '0.5',
                    'position': 'absolute',
                    'height': '150px',
                    'width': '150px',
                    'z-index': '100'
            })
                .appendTo($('body'))
                .animate({
                'top': cart.offset().top + 10,
                    'left': cart.offset().left + 10,
                    'width': 75,
                    'height': 75
            }, 1000, 'easeInOutExpo');

            setTimeout(function () {
                cart.effect("shake", {
                    times: 2
                }, 200);
            }, 1500);

            imgclone.animate({
                'width': 0,
                    'height': 0
            }, function () {
                $(this).detach()
            });
        }
    });
</script>
When you click on add to cart button it took that item image and change its size and opacity and animate it to cart icon area and hide image and shake basket.
CSS used for this tutorial to make it looks nice:
<style>
    * {
    margin: 0;
    padding: 0;
}
body {
    background-color: #F2EEE9;
    font: normal 13px/1.5 Georgia, Serif;
    color: #333;
}
.wrapper {
    width: 705px;
    margin: 20px auto;
    padding: 20px;
}
h1 {
    display: inline-block;
    background-color: #333;
    color: #fff;
    font-size: 20px;
    font-weight: normal;
    text-transform: uppercase;
    padding: 4px 20px;
    float: left;
}
.clear {
    clear: both;
}
.items {
    display: block;
    margin: 20px 0;
}
.item {
    background-color: #fff;
    float: left;
    margin: 0 10px 10px 0;
    width: 205px;
    padding: 10px;
    height: 290px;
}
.item img {
    display: block;
    margin: auto;
}
h2 {
    font-size: 16px;
    display: block;
    border-bottom: 1px solid #ccc;
    margin: 0 0 10px 0;
    padding: 0 0 5px 0;
}
button {
    border: 1px solid #722A1B;
    padding: 4px 14px;
    background-color: #fff;
    color: #722A1B;
    text-transform: uppercase;
    float: right;
    margin: 5px 0;
    font-weight: bold;
    cursor: pointer;
}
span {
    float: right;
}
.shopping-cart {
    display: inline-block;
    background: url("shoping_cart1.png") no-repeat 0 0;
    width: 24px;
    height: 24px;
    margin: 0 10px 0 0;
}
</style>
This CSS beautify cart items.
HTML
This markup create items listing with item images make sure that you are using same id’s if want to change then must change them in your jQuery as well.
<div class="wrapper">
     <h1>PHPGang Store</h1>
    <span><i class="shopping-cart"></i></span>

    <div class="clear"></div>
    <div class="items">
        <div class="item">
            <img src="item1.jpg" alt="item" />
             <h2>Item 1</h2>

            <p>Price: <em>$1449</em>
            </p>
            <button class="add-to-cart" type="button">Add to cart</button>
        </div>
        <div class="item">
            <img src="item2.jpg" alt="item" />
             <h2>Item 2</h2>

            <p>Price: <em>$649</em>
            </p>
            <button class="add-to-cart" type="button">Add to cart</button>
        </div>
    </div>
</div>
That’s all for today’s tutorial a very simple and easy to understand tutorial download it and use it in your web applications and for exact results there is a demo available must check it before downloading code.
I hope it helps you, so please give us your feedback and share your experience with us. Don’t forget to share with your friends on Facebook, Twitter and Google plus.
Tutorial Categories:


can you show amount how much items and price in basket after adding ?
Thanx in advance!
learn how to code on your own men!.
use your skills and logic.
One critique I have is using the SetTimeout for the cart effect. I would have rather seen you use jQuery Promises for that instead
Great! Thank you.
nice tutorial..bt can u tell me how to execute php query after the jquery effect..because when i add the php query, the jquery effect does not showing..thank you..
Geart Job
Why are you using other people’s code and claiming it as your own?
Hello Chris,
I am not claiming that its mine given a link of via in the bottom of my article and just eddied it hope that its clear now that its not mine.
nice super…..!
In the mobile version the image is flying straight rather than going to right