How to Make a Custom Video Player with JavaScript, Part 2
This is the second part of our tutorial How to Make a Custom Video Player with JavaScript, Part 1, in first part we show you some CSS and basics of HTML. In this part we are going to explain a MediaController object to hold the Video Player functionality so we do not pollute the global scope and finalize it and give you download code.
JavaScript API
We will create a MediaController object to hold the Video Player functionality so we do not pollute the global scope.
var MediaController = {
        initialize: function(containerClass) {
            var videos = document.getElementsByClassName(containerClass);
            for (var i = 0 ;i < videos.length;i++) {
                var  videoTag = videos[i].getElementsByTagName("video")[0];
                videos[i].appendChild(this.createSingleController(videoTag));
            }
        },
At first, we create the object and add an initialize method which we have to call to add the player’s functionality. It accepts one parameter – the name of the class which wraps each individual video.
In it, we loop over each container with that class and call createSingleController() with the video tag that is contained within that class as an argument.
The createSingleController() method does what you might expect – creates all the functionality of the video player but only for one video.
The createSingleController() method does what you might expect – creates all the functionality of the video player but only for one video.
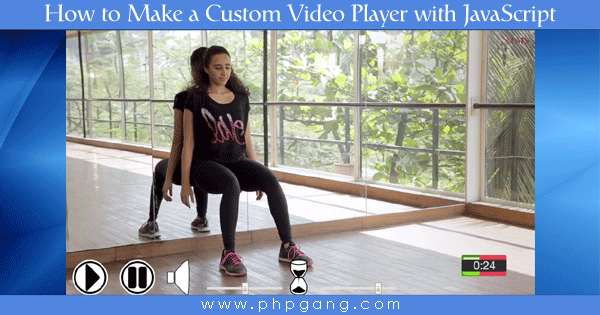
In it, we create a container div with the class of video-menu and add each button to this div along with its functionality.
createSingleController: function(videoTag) {
            var div = document.createElement("div");
            div.className = "video-menu";
            //add play button
            var play = document.createElement("button");
            play.className = "control playVideo";
            play.onclick = function() {
                videoTag.play();
            }
            div.appendChild(play);
     // add pause button
            var pause = document.createElement("button");
            pause.className = "control pauseVideo";
            pause.onclick = function() {
                videoTag.pause();
            }
            div.appendChild(pause);
Then, we create the volume and time controls which are a bit more complicated in that there is both a button which does nothing and a input with type set to range.
//add volume controls
            var volume = document.createElement("div");
            volume.className = "inline";
            volumeImage = document.createElement("button");
            volumeImage.className = "control volume";
            volume.appendChild(volumeImage);
            var volumeControl = document.createElement("input");
            volumeControl.type = "range";
            volumeControl.setAttribute("step", 0.05);
            volumeControl.setAttribute("min", 0);
            volumeControl.setAttribute("max", 1);
            volumeControl.onchange = function() {
                videoTag.volume = this.value;
            }
            volume.appendChild(volumeControl);
            div.appendChild(volume);
JavaScript’s volume property of videos accepts values from 0 to 1. For example, 0.5 would mean the volume is set to 50% and 0.9 to 90%. That is why we set the range to step with 0.05 (5%) and be at least 0 and at most 1.
Then, we add the controller for changing the playback time which could be re-factored to work better:
// add time controls
            var time = document.createElement("div");
            time.className = "inline";
            var timeImage = document.createElement("button");
            timeImage.className = "control time";
            time.appendChild(timeImage);
            var timeControl = document.createElement("input");
            timeControl.type = "range";

            timeControl.setAttribute("min", 0);
            window.setInterval(function(t){
                if (videoTag.readyState > 0) {
                    timeControl.setAttribute("max", videoTag.duration);
                    clearInterval(t);
                }
            },500);
            var isPaused = false;

            timeControl.setAttribute('step', 0.05);
            time.appendChild(timeControl);
            div.appendChild(time);
            videoTag.ontimeupdate = function() {
                timeControl.value = this.currentTime;
            }

            timeControl.onchange = function() {
                videoTag.currentTime = timeControl.value;

            }

            timeControl.onmouseenter = function() {
               if (!videoTag.paused) {
                   isPaused = true;
                   videoTag.pause();
               }

            }
            timeControl.onmouseleave = function(){
                if (isPaused) {
                    videoTag.play();
                    isPaused = false;
                }


            }
We add the time button, loop until the video is ready and if it is ready – we set the maximum value of the range input to be the duration of the video. When the video’s time progresses – we update the input appropriately. If the user puts his mouse on the input – we pause the video if it is playing and when he removes his mouse from the input – we play it but only if it was playing before he initially placed his mouse on the input. Of course, we also listen for changes in the value of the time input and set the playback time appropriately when the value changes.
Finally, we return the div and initialize the Video Player.
return div;
 }
        };
 MediaController.initialize("media-wrapper");
Conclusion
I hope you have seen that making your own Video Player is not that difficult, even without frameworks. Now, you can build your own custom video players and sell them online.
What do you think about this video player implementation, how would you make it better? What features would you add? Feel free to modify my code and post your versions of this video player in the comments below.
Tutorial Categories: