


How to Use Form Validation Pattern With HTML5?
Form validation is essential, as it helps to collect correct data (or valid form values) from the users in a secure way. Most significantly it provides you with options to identify users where they’ve gone wrong while filling the form. JavaScript was necessary for implementing client-side form validation, but not anymore, thanks to HTML5 you can validate your forms without messing around with the complex JavaScript coding.
HTML5 has introduced several benefits, and among them, a dozen of new input types and attributes appears to be the most important one; because they help validate the form without writing complicated JavaScript validation code.
To help you better understand how you can validate forms using HTML5, in this tutorial, I will explain a working example of validating a booking form.
Let’s Get Started
HTML5 Doctype is a recommended resource here since it will help you to avert the validation errors. Another advantage to using them is that even in the case of some old browsers not supporting them, the HTML won’t really toss at you any errors.
Before proceeding, it is worth knowing that HTML constraint validation API help validate form fields with minimal JS coding, by using the most appropriate input types and attributes. Another key aspect that you must be aware of is that you’ll need to use HTML5 DOCTYPE, in order to avoid HTML5 validation errors.
Creating a Form With Validations Using HTML5
Client-side form validation is fast and helps enhance user experience. It helps in providing feedback to users instantly without making a trip to the server again and again, however, a server-side form validation will still be required.
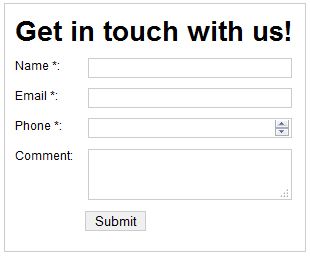
Now let us look at an example that demonstrate how a booking form can be validated, simply by using browser’s built-in validation.
<form action="" method="post">

        <h3>Get in touch with us!</h3>

        <div>

            <label for="name">Name (required):</label>

            <input type="text" id="name" name="name" value="" aria-describedby="name-format">

        </div>

        <div>

            <label for="email">Email (required):</label>

            <input type="text" id="email" name="email" value="">

        </div>

        <div>

            <label for="phone">Phone (required):</label>
            <input type="number" id="phone" name="phone" value="">

        </div>

        <div>

            <label for="comment">Comment:</label>

           <textarea id="comment" name="comment"></textarea>

        </div>
        <div class="submit">

            <input type="submit" value="Submit">

        </div>

</form>
Output:
As you can see in the code above, a <label> tag is appended to every input field with a “for attribute” that is compared with its associated input tag “id attribute”. This helps in keeping our HTML semantic.
Additionally, the labels also help associate certain meaning to input controls. This implies that whenever the label is clicked, the input tag gets the focus.
What’s more? Since the screen reader users will read the text provided in the label, to identify the essential fields that they cannot miss to fill, we just need to add ‘required’ to the label text (as shown in the code above).
Required fields
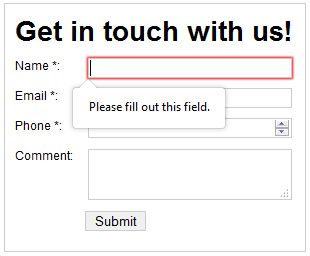
The task of validating the required fields is just as simple as adding the “required attribute” to every <input> tag. In our example, our input tags consisted of required fields: Name, Email, and Phone. You can represent the Name field in the following manner:
<div>

        <label for="name">Name:</label>

        <input id="name" name="name" value="" aria-describedby="name-format" required>

</div>
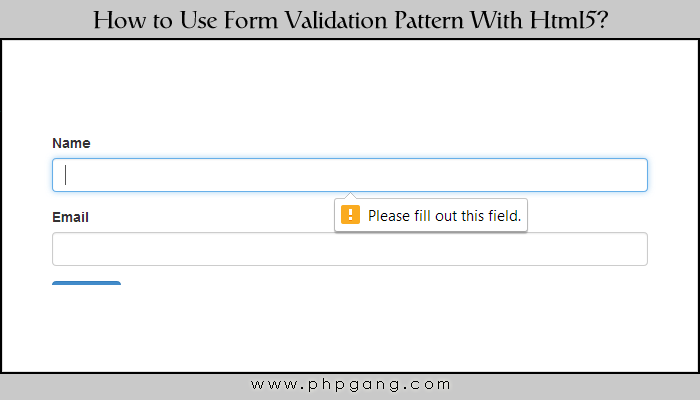
So, if you will submit the form without entering any input in the Name or any other required field, the browser will generate an error notification as shown below:
Note: Keep in your mind that all the browsers might not implement the required attribute. And so, your required fields might not be picked in the correct manner in some browser. In that case, it is recommended that you should add aria-required=”true” to the required attribute:
<input id="name" name="name" value="" aria-describedby="name-format" required aria-required="true"/>
Defining Patterns for Data That Needs to Be Validated
By now, our users will be notified to fill the complete required form fields. However, there is one thing we’ll have to scrutinize: whether users are entering the right data that we require or not. For instance, you may want the ‘Name’ field to be filled in the format: ‘first name’ and ‘last name’, and might want any numeric or character to be added. For this purpose, you just need to integrate a “pattern attribute” to the ‘Name’ field in the following manner:
<input id="name" name="name" value="" aria-describedby="name-format" required pattern="[A-Za-z-0-9]+">
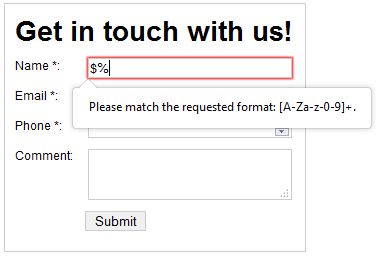
In the above screenshot, you can see that on entering a character ‘@’, an error notification is generated.
It would be better to specify the exact format that users need to follow any particular field, though this isn’t necessary but a recommended exercise. You can do so, by adding the below line of code:
<input id="name" name="name" value="" required pattern="[A-Za-z-0-9]+" title="[A-Za-z-0-9]+">
Validating Input Types (Email and Phone)
We also need to make sure that our users are populating rest of the input types including email and phone with the right data. For doing so, we can make use of HTML new input types as mentioned below:
<input type="text" id="email" name="email" value="" required>

…

<input type="number" id="phone" name="phone" value="" required>
By explicitly specifying the most suitable type, our browser will ensure that the data is validated and all the required entries are made in their respective fields only.
Leveraging CSS to Highlight: Required Fields and Invalid Data
While HTML5 gives us with a number of new input types and attributes, on the other hand, CSS3 provides certain new pseudo-classes. These classes offer the user with visual clues regarding the form fields that are required, optional, and the ones with invalid data. Let us now consider an example to see how we can use the pseudo-class to highlight these visual clues.
In order to highlight the required fields, you’ll have to use “:required” pseudo-class:
input:required {

    background: #fcfbc0;

    border:1px solid #999;

}
Next, to highlight optional fields you’ll have to make use of the “:optional” pseudo-class.
input:optional {

    background:#f19999;

    border:1px solid #e44f4f;

}
Finally, to identify whether the data in the form is correct or not can be notified to the user using four type of pseudo-classes, as listed below:
1. :valid,
2. :invalid
3. :in-range
4. :out-of-range
Let’s see how invalid data can be highlighted using the :invalid pseudo-class:
input:invalid {

    background:#f19999;

    border:1px solid #e44f4f;

}
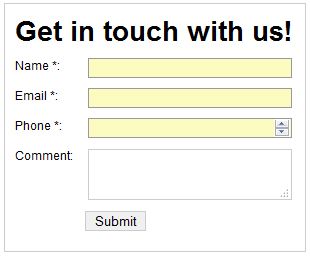
Once all the above discussed changes are made, our final HTML will look something like:
<form action="" method="post">

        <h3>Get in touch with us!</h3>

        <div>

            <label for="name">Name *:</label>

            <input id="name" name="name" value="" required pattern="[A-Za-z-0-9]+" title="[A-Za-z-0-9]+">

        </div>

        <div>

            <label for="email">Email *:</label>

            <input type="email" id="email" name="email" value="" required>

        </div>

        <div>

            <label for="ranking">Phone *:</label>

            <input type="number" id="ranking" name="ranking" value="" min="1" max="5" required>

        </div>

        <div>

            <label for="comment">Comment:</label>

            <textarea id="comment" name="comment"></textarea>

        </div>

        <div class="submit">

            <input type="submit" value="Submit">

        </div>

</form>
That’s it for now! Hope this post will benefit you in implementing form validations correctly using the HTML5.
Tutorial Categories:


I like the pattern validation by HTML 5 …. 🙂
nice to use …thanks!
Thanks a lot. can get more knowledge.
Great tutorial. Thanks.
Hi Sarah, great article however you forgot to mention the part of how unsecure this method is, and people shall rather use server side validation.